 Testimonials
Our Clients Feedback
Olivia .C
Ethan .B
Sophia .N

Tom did a very good job, very knowledgeable, very through on explaining everything. Highly recommend their services.


Fixed one problem on the spot and scheduled repair of the main problem. Tom was very thorough.

They gave a quick response and the quatation was great. The process was easy and the technician showed up on time. The ducts are now clean and the air is just quality. I would highly and definitely recommend this company.

Really good service from the Airwayz Air Duct Services team. This is the second time I’ve used them for annual maintenance services and they’ve done a great job both times. Shout out to Bryan who was especially helpful this last time.
They take digital credit card payments and they have a very easy to use online scheduler. I plan on using these guys again.

I can't speak more highly of Airwayz. We had a problem with the scheduled time of our duct cleaning. Frustrated, I asked to cancel the entire job.
The owner personally drove over, apologized, and wrote me a check to refund our deposit. No arguing, no attempt to talk me out of canceling.
He stood up, took responsibility for his employee's errors and did the right thing. Impressive.
When the time comes to replace our system, Airwayz will be my first and only call.

Are technician Tom had called prior to coming and showed up right on time as he said. He explained in detail about how to clean out a dryer vent and what was involved and the cost as well. He showed us the views of the camera inside the ductwork and then what had happened outside with his phone video on the roof. All went well he tested everything and just can't rave enough about what a great job he did. I would highly recommend this company .

We had them over for a commercial duct cleaning that was needed at our office and they handled it smoothly. Quick response and competitive rates made the decision easy to pick them here is Flagler Beach.

A clogged dryer vent was making my dryer work a lot harder than it should have. This business responded quickly and got everything cleaned out without any hassle. The technicians were great to deal with and the dryer is running much better now.

Full Insulation & Duct work. Shilo (Tom) is your 1st point of contact to explain in laymans terms what U need in your home, with no up sale in mind. Lissette (Communication) will answer any questions U may have & put U on a VIP list & will return calls immediately. Workers (Andrea, Nikole, Allen & 2 more Dudes). These guys & Gal are truly awesome. Prompt to site, clean up & hard working. Dawn will also confirm scheduling. Their leader is Shon (Owner) surrounded himself with talent. Overall, the County Inspector & A Plumber never have seen such a professional Duct/ Insulation job. And for the first time in 10 yrs my wife drapes a quiIt around her BC of the cool air flow in the rooms. Highly recommend Airwayz to ALL.
On the bottom of this text are before & after photos. Judge for yourself. (JUNE 2026 )
We had them over for a commercial duct cleaning that was needed at our office and they handled it smoothly. Quick response and competitive rates made the decision easy to pick them here is Flagler Beach.
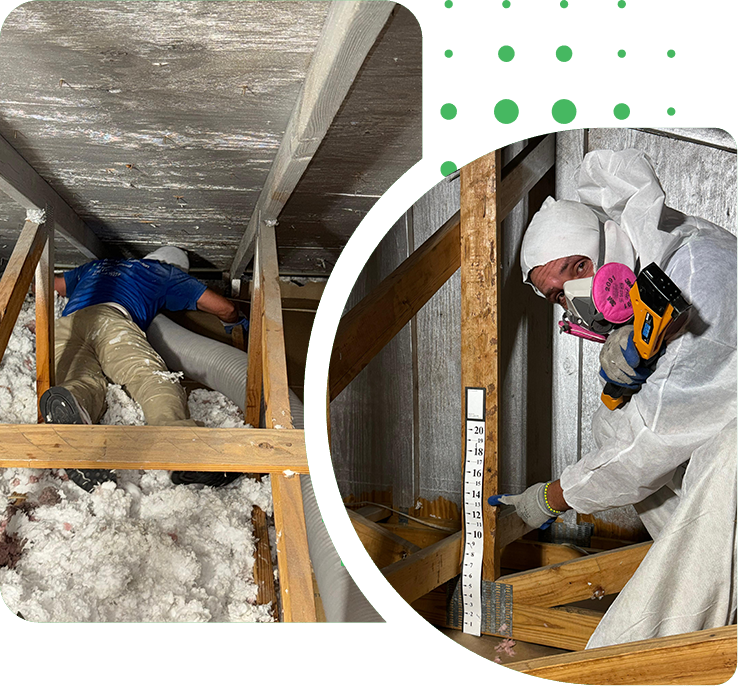
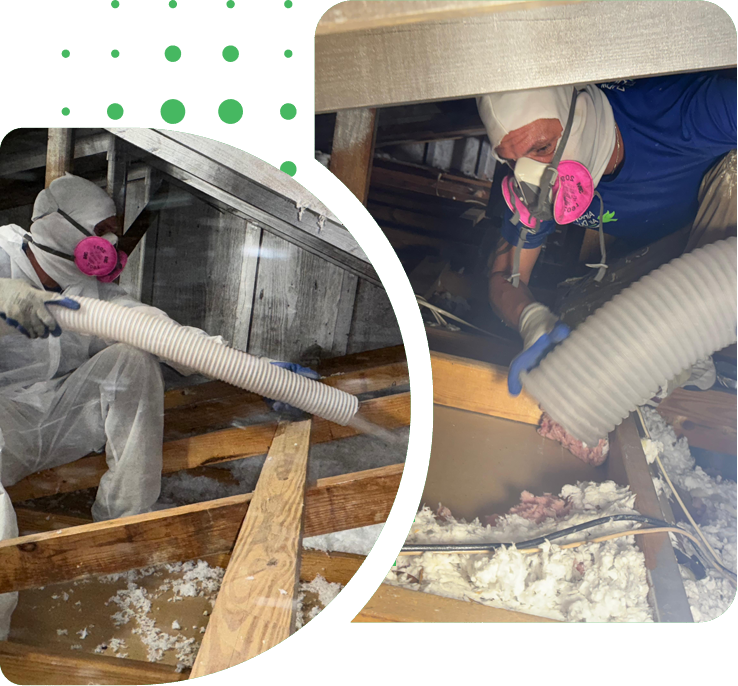
Dryer Vent Installation
Professional Dryer Vent Installation - Safe, Efficient, and Code-Compliant
Proper dryer vent installation is essential for the safety, performance, and longevity of your appliance. A poorly installed or incorrectly routed vent can lead to overheating, excess moisture, mold growth, and even fire hazards. At Airwayz, we provide expert dryer vent installation services designed to meet all local building codes, optimize airflow, and protect your home or business. Whether you're installing a brand-new dryer, remodeling a laundry area, or upgrading from an outdated setup, our certified technicians ensure that your venting system is installed correctly - the first time.

Contact Us
Reach out by phone or fill out our quick form. Our team is ready to answer your questions and understand your needs.

Receive a Quote
We’ll provide a clear, no-obligation quote based on your home and the service required—no hidden fees.

Schedule & Get It Done
Choose a time that works for you. Our experts arrive on time, complete the job efficiently, and leave your home cleaner and safer.
Testimonials
Our Clients Feedback
Olivia .C
Ethan .B
Sophia .N

Airwayz
Why Choose Airwayz?
Personalized Project Management
You get direct support from our team throughout the entire process.
Clear Timelines
No surprises. We show up on time and finish as promised.
Licensed Professionals
Every technician is certified and trained to deliver safe, lasting results.
Local Experience
We understand Florida’s unique air quality challenges, high humidity, and building standards - and we tailor our solutions accordingly.
Related Articles
Palm Coast Dryer Vent Installation Code, Permits & Safety – Homeowner’s Guide
Palm Coast’s Best Air Duct Cleaning & Insulation Provider: Airwayz Air Duct Services
Beyond The Beach Breeze: Why Your Palm Coast Home’s Air Quality Might Be Suffering
Experience The Pinnacle Of Air Duct Cleaning In Palm Coast.
People Also Ask
Yes, you can install a dryer vent yourself, but it requires careful attention to safety and local building codes. The most common mistakes include using plastic or foil tape instead of metal clamps, creating long runs with too many bends, and failing to vent directly outside. A poorly installed dryer vent can trap lint, reduce dryer efficiency, and create a serious fire hazard. For homeowners in Palm Coast and Flagler County, it is often worth considering professional help to ensure the job is done right. For a deeper look at the risks of taking shortcuts, we recommend reading our internal article titled DIY Vs. Pro Air Duct Cleaning: Why Going The Cheap Route Can Cost You More. Airwayz Duct and Insulation recommends using rigid metal ducting and keeping the total length under 25 feet for best performance.
The cost of a dryer vent installation in Palm Coast and Flagler County varies based on factors like vent length, wall material, and accessibility. On average, homeowners can expect to spend between $150 and $400 for a standard installation. More complex jobs, such as those requiring a new exterior vent cap or routing through a second story, may cost more. It is critical to use rigid metal ducting, as plastic or foil can be fire hazards. For a detailed breakdown of local code requirements and permit rules, please review our internal article titled Palm Coast Dryer Vent Installation Code, Permits & Safety – Homeowner’s Guide. Airwayz Duct and Insulation recommends always getting a professional quote to ensure your installation meets safety standards and avoids costly mistakes.
For dryer vent installation, a licensed and insured contractor specializing in HVAC or duct work is the most qualified professional. While a general handyman might attempt the job, improper installation can lead to lint buildup, fire hazards, and poor dryer performance. In Palm Coast and Flagler County, local building codes often require specific permits and inspections for this work, making it essential to hire a specialist who understands these regulations. At Airwayz Duct and Insulation, we focus on ensuring your dryer vent meets current safety standards for airflow and clearance. For a complete breakdown of local requirements, refer to our internal article titled Palm Coast Dryer Vent Installation Code, Permits & Safety – Homeowner’s Guide.
A dryer vent typically attaches to the wall through a wall vent hood or exhaust outlet that is installed through the exterior wall. The metal duct from the dryer connects to this wall-mounted hood using a clamp or a metal collar. It is critical to use rigid metal or semi-rigid metal ducting, never plastic or foil, as these materials are fire hazards. The connection must be sealed with metal foil tape, not screws, to prevent lint buildup. For homeowners in Palm Coast and Flagler County, proper exterior termination is vital for safety and code compliance. Airwayz Duct and Insulation recommends reviewing the local requirements detailed in our article Palm Coast Dryer Vent Installation Code, Permits & Safety – Homeowner’s Guide to ensure your installation meets all safety and permit standards.
For homeowners in Palm Coast and Flagler County, proper dryer vent installation is critical for both fire safety and energy efficiency. A standard installation involves using rigid metal ducting, not foil or plastic, to prevent lint buildup and reduce fire risk. The vent run should be as short and straight as possible, with a maximum length of 25 feet for optimal airflow. Every connection must be sealed with metal foil tape, not screws, to avoid catching lint. If you are considering a new installation or replacement, it is essential to follow local building codes. For detailed guidance on compliance and safety, please refer to our internal article titled Palm Coast Dryer Vent Installation: Code, Permits, And Safety. Airwayz Duct and Insulation can help ensure your system meets these professional standards.
For homeowners in Palm Coast and Flagler County, dryer vent installation must follow specific safety codes to prevent fire hazards and ensure efficiency. The International Residential Code (IRC) requires that dryer exhaust ducts be constructed of smooth, rigid metal with a minimum thickness of 0.016 inches. Flexible foil or plastic ducts are prohibited due to lint accumulation risks. The maximum developed length of the duct system is 25 feet, with deductions for each elbow or fitting. All joints must be secured with mechanical fasteners and sealed with approved tape or mastic; screws should not protrude into the duct interior. For a detailed breakdown of local requirements, including permit processes, we recommend reading our internal article titled Palm Coast Dryer Vent Installation: Code, Permits, And Safety. Airwayz Duct and Insulation can help ensure your installation meets all current standards for safety and performance.
